
From the Shop: Digital Scales - "The YADRO-Files" : Part 4
The Display:
The current version looks slightly different.
Introduction:As I already said, I wanted to connect digital scales to a computer. I did not want the usual displays you can either buy for starting at $250 to well above $1000. Because I always felt that every model was missing something or it was only useable for a mill or a lathe. But I do have both tools, so I wanted something flexible. Flexible does not mean that I have 2 different programs, one "mill.exe" and one "lathe.exe", but one program using dedicated configuration files. Let me shortly tell you about my background: I have been programming for about 20 years and, during that time, done some electronics. Programming was done for my living. During that time, I liked to program interpreters and to develop languages. About 4 made it into commercial products. So it was clear that I wanted a display-engine that does know as little as possible about axes etc. The reason is that I can't foresee what you intend to do, what functionality you need and that I was sure: There is always one more feature missing. So this display engine is driven by a language that controls what to do with the values coming from the digital scales, can scale the values, make translations in the axis system, mix axes to build a new one, etc. YADRO is very flexible. The state YADRO is in for now is "under development". I have many more ideas what to add. But as it is now, it is a working and usable system.
Requirements:YADRO needs to be run under DOS.
I have tested it with DOS 6.22 and the current FreeDOS-version. I
strongly do not recommend to let it run under Windows. MS messed up the
whole communication subject. YADRO can run in a DOS-box of Windows 3.1.
Slower PCs (75MHz ballpark) might drop some characters from the serial.
when run under Win3.1, so stay away from anything that stinks like GUI. YADRO needs a serial port and 640KBytes of RAM. And YADRO needs the interface from part 3. |
|
YADRO is free for private use. You are not allowed to redistribute it. |
You have to download YADRO.EXE and its configuration-file YADRO.CFG and install them on your computer.
YADRO.EXE has version 0.1c.
You further need a DPMI-server (DosProtectedModeInterface). I bet you can get one for free a FreeDOS. Or get the one I use from the DJGPP-project at www.delorie.com/djgpp (if you look at the zip-picker) or use this dirct link: ftp://ftp.delorie.com/pub/djgpp/current/v2misc/csdpmi5b.zip to download it.
Note, that YADRO requires the latest version of the YADRO-DROINTs software. It is V0.2
YADRO needs a serial port accessible as COM1: … COM4: You can configure YADRO to access the port you want
If YADRO can't connect to the serial port, it will tell you. In most
cases, that is. I have reports, that (with an elder version), YADRO
hanged after showing the splash screen. If this happens, chances are
that you didn't let it run on DOS.
If you don't have a plain DOS-box available, format a floppy disk with a system (format a: /s), copy YADRO.EXE, YADRO.CFG and the DPMI onto the disk and boot from the diskette. That's enough for a working system.
The YADRO.CFG-file provided is for a mill. A cfg-file for a lathe does not yet (Oct 2005) exist, it will be added in the near future.
Starting YADRO
First of all, start the DPIM-server by typing csdpmi. Ther is no need for configuring anything.
If you have set up your DOS-system (again, don't use it under Windows),
you have some options to start YADRO. By default, it will use COM1: for
communication and YADRO.CFG as it's configuration-file.
You can select a different port if you invoke YADRO with a -p:COMx: option, where x is the port number (1…4). For example YADRO -p:COM3: will start YADRO and select COM3: for communication.
You can select a different configuration file if you invoke YADRO with a -c:filename option, where filename is the configuration file you want YADRO to load. For example YADRO -c:mill.cfg will use mill.cfg as YADRO's configuration file.
You can combine the -c: and -p: options.
Using YADRO
Here is a brief description. As questions come, I'll add answers. Please contact me, if you have any problems! It's best if you e-mail me muellernick/at/gmx/dot/de.
If you want to have a look at YADRO before having the digital interface, you can. You still need a serial port and you have to locate the lines in YADRO.CFG that say:
Interp:
  display("ConnectAs", 0, 0);
  display("ConnectAs", 1, 1);
  display("ConnectAs", 2, 2);
:EndI
You comment them out by putting a semicolon (;) at the leftmost position of these 5 lines. This way, YADRO will "read" zeros from the non-existing digital interface. But still, YADRO tries to open the port.
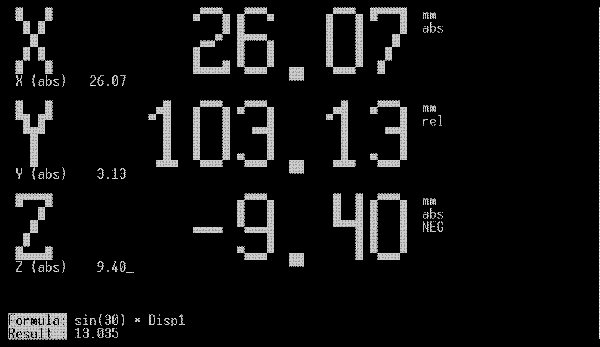
When you finally have started YADRO, you will have a screen that looks like the screen shot at the top of this page.
You now have the following options:
- Move around with your milling head.
- Press the Tab-key to access the formula-calculation mode
- Press a function key to directly call a macro
- press some letter-key to select a macro from a list
Formula-mode:
YADRO
has its own interpreter. It also is used for solving calculations
(computerese: expressions). Such an expression is something you would
normally type into your pocket calculator. YADRO has about the same
functions. That is sin, cos, tan, asin, acos, atan, sinh, cosh, tanh,
sqr, sqrt, log, exp, pow. You simply type in a line like (33.5 + 50 ) / 3 * sin(50)
to get an answer. You even can, if you know a bit of the inner
workings, access variables. The most interesting of them are the
current values of every axis. For the first axis, it is Disp1, the second is Disp2 etc. The contents of secondary axis is accessed with DispSec1
etc. The names are case sensitive! For example if you want to know what
the third of the current value of the Y-axis is, type a Disp2 / 3 and off you go!
Function-key:
Macros
can be bound to function keys. This allows you the fastest access to
macros you quite often use. If you want to know what F-key is bound to
what macro, you have to open the macro-list selection and look at the
broad window at the buttom. On the rightmost, it shows the key.
Macro-list selection:
If
you press some key that is a letter, or a "printable", a macro-list
pops up. You can navigate through that list with the cursor keys (arrow
up/down, page up/down etc.) to select a macro. Pressing Ret on a macro
executes it.
You can also quickly access macros when you know its
name. If a macro is named "CX Dowhatever" and your first character
pressed is a "c" (case doesn't matter her), the first macro starting
with a c is selected. So you can access that macro by pressing "cx" and
then the enter key (assuming that there are other macros starting with
"c", but only one starting with "cx").
You can leave the macro-list by pressing Escape
Stepping-mode:
There
is a special mode for YADRO that is not user-selectable, but selected
by macros. It is used when a macro is within a loop that requires
further input or has to wait for a user operation (like drilling a
hole) to take place. A well known example are hole circles. The macro
computes the next location, waits for the user to drill the hole and
after a confirmation that the operation is done continues with the next
step (or hole). That mode can be recognized by the inverse
"stepping..." in the lower left. To stay with the hole circle-example,
you press Enter after each hole to get the next coordinates. If you
want to break that loop (didn't want to make a hole circle or only want
a partial) you press Esc. The macro's loop is terminated and you fall
back into normal mode.
Available Macros
I hope that there will be a lot of user-feedback that will add a lot of macros. Currently I have no version-history. If you have developed a macro, mail it to me, or you tell me the link where it can be found. I will be glad to publish it here (together with you name, if you want).
SM Metric
Switch Metric. Switches to metric display. I suggest putting that, or "SI Inch" into the very last :Interp :EndI bracket where your startup is.
SI Inch
Switch
Inch. Switches to inch display (some call it "standard, but I don't
have the slightes clue why). I suggest putting that, or "SM Metric"
into the very last :Interp :EndI bracket where your startup is.
ZA Zero all axis
Zeros
all axis. This is not a hardware-zero sent to the devices, because that
is quite time expensive. It also would require to switch the scales
from FT-mode to normal mode, zero them, and switch back to FT. For
every scale this would take about 5 seconds. To overcome that problem,
I introduced the ShdwOffs0 etc. (for Shaddow-Offset). It is best to
zero all axis at startup to have a zero value somewhere in the middle
(doesn't really matter where exactly).
HCXY HCXY Hole circle X-Y plane
Makes
a hole-circle in the X-Y plane. You give the center of the circle
(current position is taken as initial value), the number of holes and
the starting angle. A starting angle of 0 degrees will put the first
hole on the X-axe.
AX Absolute X
Puts X-axe back in abs mode. Zeros the X-axes offset and displays a "abs" in the status part
AY Absolute Y
See AX, just for Y-axe
AZ Absolute Z
See AX, just for Z-axe
AA Absolute all (X, Y, Z)
Absolutes X, Y, and Z axis. Just like executing AX, AY, and AZ
ZX Relative X, w. curr pos as 0
Takes the current position as the relative 0-point for the X-axe.
ZY Relative Y, w. curr pos as 0
See ZX, just for Y axe.
ZZ Relative Z, w. curr pos as 0
See ZX, just for Z axe.
SX Step rel. offs. by value
Steps,
or increments/decrements (depending on the sign) the X-axe by a given
value. SX remebers the step of your last input. It is very handy to
make a line of equaly spaced holes along the X-axe.
SY Step rel. offs. by value
See SX, just for Y-axe
SZ Step rel. offs. by value
See SX, just for Z-axe
OX Offset abs X by value
Offsets X-reading by given value. Switches to relative-mode. Helps in having a local coordinate system.
OY Offset abs Y by value
See OX, just for Y-axe
OZ Offset abs Z by value
See OX, just for Y-axe
C2PXY Center w. 2 points XY-plane
Find
center between 2 points in X-Y-plane. Takes the current position as
starting point, switches to stepping mode, takes the second point (that
is when you press Ret), updates the display to reflect the center
beeing at X/Y = 0. If you have moved there, press Ret again. Display is
then switched back to the previous mode.
-X Change sign X
Changes
sign of X-axe. Simply speaking, it reverses movement. I don't suggest
to use that command if you have a flipped reading (regarding the
coordinate-system you would like to have). You should change the sign
of DevXScaling in the cfg-file instead.
-Y Change sign Y
See -X, just for Y-axe
-Z Change sign Z
See -X, just for Z-axe
Version history and changes
Initital version 0.1
Version 0.1a
- Changed YADRO to run under DOS. Now WinXP is no good decision. Win3.11 seems OK. I doubt that Win95 would work, but that's no issue at all.,
- Added pop-up window that shows errors with exact position
- Added display("Average", "GAT", <buffersize>, <threshhold>)
- Added display("Average", "WA", <buffersize>, <weightingfactor>)
- Added additional window when macro selection window is open to show longer text of macro and binded F-keys
- Added else-statement
- Removed some errors in interpreter that allowed ill-formed syntax
- Screen output got a bit faster
- Added program invocation parameter -p:<portname> to select serial port
- Added program invocation parameter -c:<filename> to select config-file
- Changed digital interfaces format of scale-readings a bit to make transmission more stable. Now, you can unplug the serial cable anytime without having problems. You only will get 0-readings.
- Added a activity-hint in the upper right corner that shows reading-activity from the scale. For every character read, a "r" or a "R" appears. Helps in finding comm-problems.
Version 0.1b (internal, not released to the public)
Version 0.1c
- break in while within if-statement did not work
- "empty" functionn-calls (eg input without assignment) did not work
- added C++-style comments. A "//" comments out until end of line.
- on some PCs the first user-selection of a macro crashed (it was a alloc-error)