

BananaMotionLink
Created by: Administrator, Last modification: 9 April 2011 by Lester Caine
Click on pictures for larger view.
Pictures of the original |
  |
Supplied drawings for link |
  |
| Note that these do not match the pictures, so the model has been laid out to more acurately match the pictures above. The arm flows smothly from the link rather than having flat side as per the drawing. |
Pro-Engineer model of the linkage displayed in MeshCAM |
|
 The difficult part of the model was getting the fillets right round the sides of the arm. Pro-engineer would not add these as the side did not actually terminate at the bend end since there is no single edge to follow. |
MeshCAM settings to process the model to a tool path |
|
 Trial and error to find the best settings. The first trial pieces were made without the interpolate on, and so the surface is ridged. As soon as the interpolate was enabled the surface finish improved. |
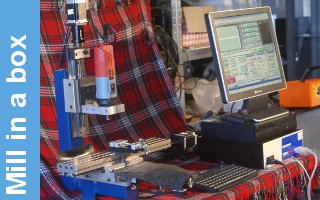
Machining on the MicroMill |
| First roughing pass 32 minutes, first finish pass 26 minutes. See the HSSToolChange page for details on how to change the tools. The sample is then turned over and aligned on the other side. To assist this I drilled a 3mm hole through the center line of the material which is then used to check that the 0,0 position is in exactly the right place on the back of the sample. Even taking great care to align the hole on the center, a small offset of 0.02 or 3 inches still happened, but this can be removed before machining the back. The second side takes about the same time as the front, so a total machining time of under 2 hours. It would probably be quite practical to increase the cutting depth on the roughing cuts in MDF, but I need to find a more clean cutting material for pattern making. |
If at first you don't succeed ....... try .. try .. try again |
|

The main problem was finally tracked down to the Z axis, despite the appearance of the two side being offset in the Y axis. The two tools were supposed to be the same length, but it turned out that the 3mm ball nose was 0.01" longer than the 6mm. In addition, the 6mm was actually too tight to the surface of the material. As soon as this was backed off, and the overlay between the two halfs increased a clean sample was generated.
|
Finally achieved an acceptable sample |
|
 A pattern ready for casting. It would be nice now to cut this straight into brass, but that will need the model scaled a small amount since it is currently over size to allow for shrinkage. |
The finished model can be found on Harrye's site about the Lion. |